ATTACHMENTS
[10/09/2006]
I was determined to get the horizontal stabilizer attached to the tail boom, so that is exactly what I did today.
 I started by drilling the holes for the mounting bolts. This was not an easy task. I had
to figure out a way to line up the drilling guide I had made early on, and mark where to drill
the holes. I used less-than-perfect methods (mostly just using my eyeballs and hands) to get
the alignment right, and then I confidently drilled the holes. Perhaps not the best approach,
but I pretty much got it "right on the money" as they say.
I started by drilling the holes for the mounting bolts. This was not an easy task. I had
to figure out a way to line up the drilling guide I had made early on, and mark where to drill
the holes. I used less-than-perfect methods (mostly just using my eyeballs and hands) to get
the alignment right, and then I confidently drilled the holes. Perhaps not the best approach,
but I pretty much got it "right on the money" as they say.
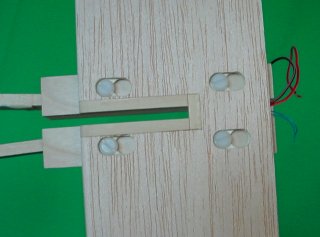
 I then tapped the holes with a 10-32 tap and dropped in some 10-32 nylon bolts. These bolts
obviously are way too long, but that is the length they are sold in, and I will eventually
be cutting them down a lot shorter once the tail section nears completion. This was my first
trial fitting - the moment I had been striving toward for some time - to see if the alignment
of the bolts coincided with the holes in the horizontal stabilizer. This probably should have
been the biggest trick of the project thus far - to get a square pattern of bolts to line up
with a square pattern of holes.
I then tapped the holes with a 10-32 tap and dropped in some 10-32 nylon bolts. These bolts
obviously are way too long, but that is the length they are sold in, and I will eventually
be cutting them down a lot shorter once the tail section nears completion. This was my first
trial fitting - the moment I had been striving toward for some time - to see if the alignment
of the bolts coincided with the holes in the horizontal stabilizer. This probably should have
been the biggest trick of the project thus far - to get a square pattern of bolts to line up
with a square pattern of holes.
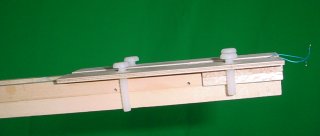
 It was beautiful! The stabilizer slipped right over the bolts and slid back into place. I
had to experiment with the tension on the bolts to get it so they were firm enough to hold
the stabilizer in place, but not so firm that I could not slide the assembly back and forth
on the seat. Once the fin is installed, this will prevent the stabilizer from sliding
forward. The bolts eventually will be glued in place - the idea is to not have to loosen or
tighten them in the field...or ever.
It was beautiful! The stabilizer slipped right over the bolts and slid back into place. I
had to experiment with the tension on the bolts to get it so they were firm enough to hold
the stabilizer in place, but not so firm that I could not slide the assembly back and forth
on the seat. Once the fin is installed, this will prevent the stabilizer from sliding
forward. The bolts eventually will be glued in place - the idea is to not have to loosen or
tighten them in the field...or ever.
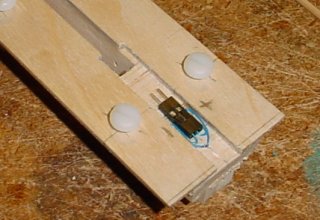 I inserted the male connector into the female connector under the horizontal stabilizer,
applied some super glue to the bottom of the connector, loosened the bolts to allow some
distance between the horizontal stabilize and the mounting plate, slipped the stabilizer
over the bolts, slid it back, and pressed down to attach the connector to the base where
it belongs. Or so that was the idea. Unfortunately, it somehow seems to have been placed
nearly 1/8" forward from where it really should be.
I inserted the male connector into the female connector under the horizontal stabilizer,
applied some super glue to the bottom of the connector, loosened the bolts to allow some
distance between the horizontal stabilize and the mounting plate, slipped the stabilizer
over the bolts, slid it back, and pressed down to attach the connector to the base where
it belongs. Or so that was the idea. Unfortunately, it somehow seems to have been placed
nearly 1/8" forward from where it really should be.
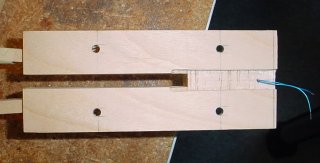
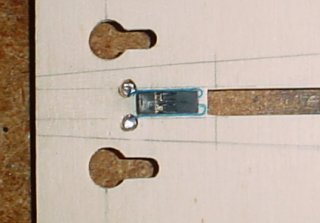 Instead of breaking the connector free and trying again (which I should
have done), I trimmed the fin slot open in the horizontal stabilizer. In the process, I
cut a wire on the horizontal stabilizer! But it was an exercise to demonstrate the benefit
of my design, as I was able to repair it rather easily. The blue wire on the top is the
one I replaced. It was looped around like the bottom wire, only it stuck out further,
into the slot, where I extended the slot opening a bit closer to the connector. I am not
too happy with the arrangement, but it works.
Instead of breaking the connector free and trying again (which I should
have done), I trimmed the fin slot open in the horizontal stabilizer. In the process, I
cut a wire on the horizontal stabilizer! But it was an exercise to demonstrate the benefit
of my design, as I was able to repair it rather easily. The blue wire on the top is the
one I replaced. It was looped around like the bottom wire, only it stuck out further,
into the slot, where I extended the slot opening a bit closer to the connector. I am not
too happy with the arrangement, but it works.
 The proof is in the pudding! All systems are go - the connectors mate, and there is
continuity in the wiring through the tail boom, and as you can see, we have lights!
The proof is in the pudding! All systems are go - the connectors mate, and there is
continuity in the wiring through the tail boom, and as you can see, we have lights!
Check back soon