SIDE ARMOR
 [11/10/2004]
Slap Happy got its side armor cut, bent and installed today. It has been a long
road to this point. I didn't go to class last Wednesday, because I didn't have anything
ready to justify making the drive out to the shop. Instead, I sat at home and made the
necessary measurements for cutting out the armor. Then, Monday, I went to class and
spent the entire evening making mistake after mistake. I must have cut out four patterns
before I got one right. But I am so glad I screwed up with cardboard and not the
expensive aluminum! Although, at the end of the night, I cut a piece of aluminum, and
I screwed that up, too -- I cut in the wrong place and did not leave enough left over to
layout another piece. But tonight, everything came together. It wasn't perfect, but it
sure came out looking nice!
 [11/12/2004]
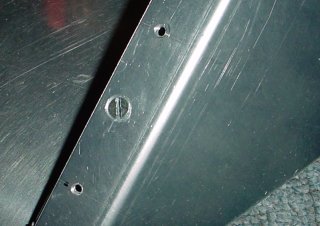
I spent some time on the side armor pieces at home today, working out the details of how it will be mounted to the frame, officially. I decided that trying to use the same bolts to hold the top armor down to also hold the side panels down, was going to lead to some difficult logistical contortions to get everything lined up to get the bolts in. So, I simplified matters by mounting the side panels separately. I just drilled a couple holes, tapped them for my bolts, chamfered the holes, and screwed in some flat head bolts. They're 8-32 bolts...not metric...and they were all I could find at Home Depot. Ugh! I hate slotted screws. Oh, well, I can't have everything. They'll be replaced someday, though. So now the side armor is affixed to the frame, leaving the top armor (once I make it) free to come off without disturbing the panels. Plus, the bolts from the top panels will reinforce the side panels as well (the other holes in the picture are for the top panels). This thing is a tank!
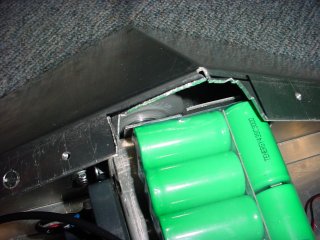
 I wanted to take Slap Happy out for another test drive, so I began (temporarily) adding
the electronic components. The batteries fit in their compartment, but as you can
see, I need to finish cutting out the opening so it is not so ragged. I ran out of time
in the shop on Wednesday, so I didn't get to square-off the cuts and debur them, but it
is enough of an opening that I am able to get the batteries in and out easily. However,
I determined that I am going to have a bit of a problem with the zip ties that hold the
batteries down once the top armor panels are installed. The problem is related to the
fact that I need two zip ties to make it all the way around the batteries. I can solve
the problem if I can find some 9-inch zip ties (of this same re-usable type).
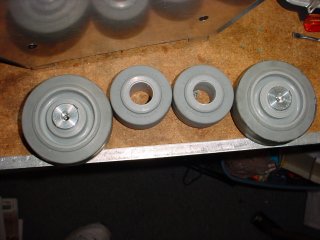
 I wanted to take another test drive, because the 3-1/2 inch wheels I had were too big to
fit within the side armor panels, and I had retro-fitted Slap Happy with new wheels.
Rather than cut holes in the armor to provide room for, and expose, the 3-1/2 inch wheels,
I picked up some 2-1/2 inch wheels from Roll Rite in Hayward yesterday...in the rain (it's
another story)...in an effort to retain the exterior physique. The new wheels are an inch
smaller in diameter - which didn't seem like much - but when compared side-by-side, I was
surprised how much smaller they are! I was concerned this would significantly alter the
driving characteristics. I also had a hell of a time adding the new wheels, because the
motors would not go down far enough to allow the wheels to descend below the base. So I
had my work cut out for me in modifying both the motors and the frame where the motor
mounts attach. It was not pretty. Or fun. But now that part is done! I also had to
machine the hubs a bit, because the wheels were just a tiny bit narrower than the bigger
wheels (even though they are advertised with the same dimensions!). I do not think I will
need to broach a keyway into the new wheels, since the split hubs offer considerable
compression against the wheel walls when assembled.
 So I hooked everything up and took Slap Happy out for a drive. It turns out, the driving
characteristics are significantly different. It is not as fast (as expected), but it is
quick enough. Hopefully. But one thing I did notice was that it was easier to handle.
It maneuvered well...probably because it simply can't go fast enough to really break
traction like it did before. I'm tempted to put another stick of batteries together to
boost the power on this thing, now. I have enough NiMH batteries to add another 9.6 Volts
to the system, bringing the total up to 24 Volts. And I have enough additional NiCds from
the drills to make a comparable back-up pack. I don't have the weight allowance to add
additional power, but that doesn't mean I can't PLAY with it that way! By the way, the
wheels seemed to be holding strong with the split hubs sans keyways.