THE VERTICAL STABILIZER (FIN)
[09/24/2006]
 As the nature of this project goes, design revisions are a continual process. Even while I am
building this, I am thinking about design considerations, especially if what I see during construction
turns out to be not as I conceived it. As for the fin, I needed to add some lateral support to withstand
rudder-induced stresses, and I also wanted the fin to have a bit of hold-down power against the horizontal
stabilizer for added root strength. I decided I could accomplish this by adding a couple of basswood
rails to the side of the fin. This required that I cut a strip off the top of the fin stiffeners to
make room for the rails.
As the nature of this project goes, design revisions are a continual process. Even while I am
building this, I am thinking about design considerations, especially if what I see during construction
turns out to be not as I conceived it. As for the fin, I needed to add some lateral support to withstand
rudder-induced stresses, and I also wanted the fin to have a bit of hold-down power against the horizontal
stabilizer for added root strength. I decided I could accomplish this by adding a couple of basswood
rails to the side of the fin. This required that I cut a strip off the top of the fin stiffeners to
make room for the rails.
 While I was conjuring up a suitable assembly procedure, I decided to spend a little time sanding the
leading edge of the horizontal stabilizer. After all, it was warm outside and the sun was still up, so
any excuse to be on the porch was a good one. In order to do the sanding I desired, I quickly made little
contour sanding tool out of a piece of scrap wood. I drilled a hole through it, then cut through the hole
on the band saw, then glued on a piece of 150 grit sandpaper. Then it was off to the races.
While I was conjuring up a suitable assembly procedure, I decided to spend a little time sanding the
leading edge of the horizontal stabilizer. After all, it was warm outside and the sun was still up, so
any excuse to be on the porch was a good one. In order to do the sanding I desired, I quickly made little
contour sanding tool out of a piece of scrap wood. I drilled a hole through it, then cut through the hole
on the band saw, then glued on a piece of 150 grit sandpaper. Then it was off to the races.
 I sanded and sanded and sanded until the leading edge was round. The little contour sanding tool worked
great, although as I was creeping ever closer to completing the job, it was taking longer and longer, as
I had just about worn out the little piece of sandpaper that was in there. I need some way to be able
to change the paper when it wears out. Oh, well - I got the job done and it looks pretty good. It will
work just fine.
I sanded and sanded and sanded until the leading edge was round. The little contour sanding tool worked
great, although as I was creeping ever closer to completing the job, it was taking longer and longer, as
I had just about worn out the little piece of sandpaper that was in there. I need some way to be able
to change the paper when it wears out. Oh, well - I got the job done and it looks pretty good. It will
work just fine.
 Then it was back to the fin. I knew what I needed to do and how I was going to do it. I figured out a
way to square up the fin and to line up the fin stiffeners just right, and I proceeded to laminate the
stiffeners to the fin sides using gap-filling CA glue. Man that worked great! Everything lined up
right where I needed it to.
Then it was back to the fin. I knew what I needed to do and how I was going to do it. I figured out a
way to square up the fin and to line up the fin stiffeners just right, and I proceeded to laminate the
stiffeners to the fin sides using gap-filling CA glue. Man that worked great! Everything lined up
right where I needed it to.
 Then it was back to the horizontal stabilizer. This time, I needed to sand the slot open for the fin
tab. I used a couple of new-found precision sanding techniques and got everything lined up like it was
laser cut from a robotic machine. I'm talking, this was an absolutely fantastic fit. All I need now
is for the temperature and humidity to change and screw it all up. Anyway, I took a few quick snaps on
the camera and moved on.
Then it was back to the horizontal stabilizer. This time, I needed to sand the slot open for the fin
tab. I used a couple of new-found precision sanding techniques and got everything lined up like it was
laser cut from a robotic machine. I'm talking, this was an absolutely fantastic fit. All I need now
is for the temperature and humidity to change and screw it all up. Anyway, I took a few quick snaps on
the camera and moved on.
 Next step was to add the side rails. I sanded one edge round (in a rather creative way, using my contour
sanding tool, though it didn't work out all that great, so went back to doing things by hand, feel and
sight). I then trimmed the rails to size before gluing them on. They came out rather nicely if I may say
so, myself.
Next step was to add the side rails. I sanded one edge round (in a rather creative way, using my contour
sanding tool, though it didn't work out all that great, so went back to doing things by hand, feel and
sight). I then trimmed the rails to size before gluing them on. They came out rather nicely if I may say
so, myself.
 And then I glued the rails to the fin. I don't know what it is about it, but I just love this assembly.
I suppose it is almost like a work of art to me - after all, I have put a lot into this project. Perhaps
it is simply the precision and accuracy of how all the pieces came together. Nothing was rushed, nothing
was done in haste, and everything was done according to a plan. All these little things come together to
shine in the end. And I love it when a plan comes together. Just look at that masterpiece!
And then I glued the rails to the fin. I don't know what it is about it, but I just love this assembly.
I suppose it is almost like a work of art to me - after all, I have put a lot into this project. Perhaps
it is simply the precision and accuracy of how all the pieces came together. Nothing was rushed, nothing
was done in haste, and everything was done according to a plan. All these little things come together to
shine in the end. And I love it when a plan comes together. Just look at that masterpiece!
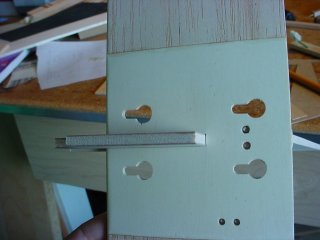 And remember that precision, laser-cut fit I mentioned earlier? Just look at that! This is a shot of
the fin tab, looking at the underside of the horzontal stabilizer, with the fin tab protruding from
the slot in the horizontal stabilizer. The picture may be a bit small, but you can pretty much see the
hairline clearances along at least one side of the tab. It is not a snug fit, yet it is not a drop-in
fit. The fin slides in smoothly and easily, right where I need it to go. I don't think I could have
done a better job. I will need to adjust it later on, however, when I get to the finishing stage, as
a coat of sealer and/or paint will alter the required clearances. But at least I know how to trim it
out when I need to (though I don't want to touch it - it is perfect the way it is - at least until it
rains or something and the wood swells).
And remember that precision, laser-cut fit I mentioned earlier? Just look at that! This is a shot of
the fin tab, looking at the underside of the horzontal stabilizer, with the fin tab protruding from
the slot in the horizontal stabilizer. The picture may be a bit small, but you can pretty much see the
hairline clearances along at least one side of the tab. It is not a snug fit, yet it is not a drop-in
fit. The fin slides in smoothly and easily, right where I need it to go. I don't think I could have
done a better job. I will need to adjust it later on, however, when I get to the finishing stage, as
a coat of sealer and/or paint will alter the required clearances. But at least I know how to trim it
out when I need to (though I don't want to touch it - it is perfect the way it is - at least until it
rains or something and the wood swells).
 The tail feathers are nearly complete. I just need to add the rudder and elevator and do some shape
sanding on the fin, and I can pretty much put it aside until they're needed for the tail assembly
procedure. The fin will be revisited to have a hole and a slot cut into the fin tab, and have
already had a new thought cross my mind for the fin design (though it's too late to change, now).
I'll make it work, and I just know it's going to work well. I just don't know if there is any real
hope of completing the tail section by Halloween - I may not get much time to work on it at all this
week, despite my wife being out of town on business.
The tail feathers are nearly complete. I just need to add the rudder and elevator and do some shape
sanding on the fin, and I can pretty much put it aside until they're needed for the tail assembly
procedure. The fin will be revisited to have a hole and a slot cut into the fin tab, and have
already had a new thought cross my mind for the fin design (though it's too late to change, now).
I'll make it work, and I just know it's going to work well. I just don't know if there is any real
hope of completing the tail section by Halloween - I may not get much time to work on it at all this
week, despite my wife being out of town on business.
I can feel it coming in the air tonight...